

Which Photovoltaic Combiner Box Is Best for Your Solar Setup
2026-08-15
Choosing a photovoltaic combiner box can feel like navigating a maze of specs. Voltage ratings, surge protection, and enclosure type all matter more than you think. If you're tired of guesswork, this guide will help you decide—and Chang Song might just be the shortcut you need.
Match Your Array’s Voltage and Current Before Anything Else
Most people get excited about panel wattage or battery capacity before they've even checked whether the array's voltage and current actually line up with the rest of the system. That's a mistake. If you connect a 24V array to a charge controller rated for 12V, or push 15 amps through wiring and fuses sized for 10, you'll either waste power or start a fire. Get these two numbers right first—everything else is just tuning.
Voltage is the more straightforward of the two. For a series string, the voltages add up, so you need to know your inverter or controller's maximum input voltage and stay well below it, especially on cold mornings when panel voltage spikes. With parallel connections, the voltage stays the same but the current climbs. That's where people get into trouble: a 4-panel parallel array at 8 amps per panel is already at 32 amps. Your charge controller, cabling, and connectors all have to handle that continuously, not just at peak sun.
Current might seem less critical because it's "just flow," but ignoring it leads to voltage drop, overheated terminals, and tripped breakers. Always match the array's maximum power current to the input rating of your power electronics, and then add a safety margin. Once those two parameters are locked in, you can start optimizing tilt angle, tracking, or battery chemistry. Until then, any adjustment you make is built on sand.
Fused vs. Breaker-Based Combiners: What Actually Fits Your System
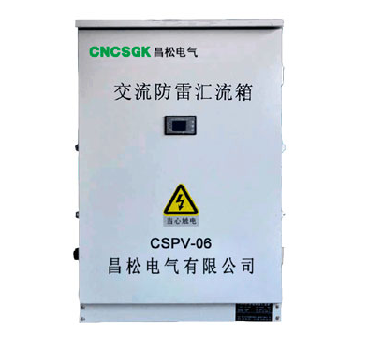
When your array grows past a handful of strings, the choice between fused and breaker-based combiners stops being theoretical and starts showing up in your fault logs. Fused combiner boxes put a DC-rated fuse in series with each input, which sounds like a clean, one-to-one protection story: a fault on one string opens only that fuse, leaving the rest of the array running while you find the bad module or wiring. The catch is that fuses don't reset. A nuisance trip from a cloud-edge transient or a mildly degraded connector means a site visit, a replacement fuse, and possibly a second visit to figure out why the same string went quiet again.
Breaker-based combiners swap those fuses for DC-rated circuit breakers that can be reset in the field, but that convenience comes with its own fine print. Breakers for PV strings need to handle sustained reverse current, not just short-circuit surges, and many generic DC breakers fail that test spectacularly when used in combiner boxes. You also lose some granularity: a single breaker usually protects a group of strings rather than one string, so a fault can take out more of the array before the breaker trips. For smaller residential or light commercial systems where branch circuits already provide protection, a breaker-based combiner can be the right balance of serviceability and cost. For larger string inverters with high fault-current potential, fused combiners tend to win because the coordination is simpler and the failure mode is more predictable.
The real deciding factor is what your inverter and your O&M workflow can actually live with. If you're running long DC homeruns and your site is in a lightning-prone area, a fused combiner with properly rated holders and spare fuses in the truck may save you from cascading shutdowns. If you'd rather reset than replace, and your array is split into a small number of high-current strings, breaker-based combiners will feel less like a compromise. Either way, match the voltage and interrupt ratings to the system, not to the cheapest catalog listing—many field failures trace back to a combiner that looked right on paper and wasn't.
Enclosure Materials and IP Ratings for Harsh Weather
Outdoor enclosures face a relentless mix of UV exposure, driving rain, salt spray, and rapid temperature shifts, so material choice is rarely a one-size-fits-all decision. Powder-coated carbon steel may look sturdy on a datasheet, but once the coating gets scratched near a coastal site, corrosion can spread beneath the surface. In those environments, 316 stainless steel or marine-grade aluminum often holds up far better, while polycarbonate and fiberglass offer a lighter, non-metallic alternative that avoids galvanic corrosion entirely.
The IP rating tells you how well an enclosure keeps out solids and water, but real-world performance depends on how that rating is maintained over time. An IP66 enclosure might shrug off powerful water jets during a test, yet repeated thermal cycling can degrade gaskets and let moisture creep in months later. For installations exposed to driving snow, flooding, or salt-laden fog, IP67 or IP68 may be necessary, but only if the cable glands, vents, and mounting hardware are matched to the same level of protection.
Harsh weather also punishes poor material combinations. Pairing stainless steel fasteners with an aluminum body without proper isolation can lead to galvanic corrosion, and some UV-stabilized plastics become brittle after years of direct sun. Rather than chasing the highest IP number, it is often smarter to look at the entire sealing system: continuous gaskets, welded or foamed-in-place seams, pressure-equalizing vents, and finishes that resist chalking and fading. A well-chosen enclosure should survive not just one storm season, but a decade of them with minimal loss of protection.
Surge Protection: Why Skipping It Can Cost You an Inverter
A nearby lightning strike doesn't need to score a direct hit to destroy your inverter. The voltage spike travels through utility lines or grounding paths, and that brief surge of extra energy finds the weakest link in your system — often the delicate semiconductor junctions inside the inverter. Even switching operations from the grid or heavy motors starting elsewhere on the same circuit can generate transients that quietly erode internal components over time.
Without a properly rated surge protective device installed at the DC input and AC output, one bad afternoon storm can turn a perfectly good inverter into a paperweight. The damage isn't always obvious right away: a slightly swollen capacitor here, a degraded diode there. Within weeks, the inverter starts throwing fault codes or simply refuses to start. Replacement boards cost a large fraction of a new unit, and the downtime means your batteries sit unused or your solar array stops feeding the house.
Spending a small amount on a quality surge protector — and checking its indicator window after every major electrical event — is far cheaper than discovering your inverter failed because a transient found an unprotected path. Good installation practice also includes keeping surge protection close to the inverter, not just at the main panel, because the length of cable between the protector and the device matters when the spike is measured in microseconds.
Leave Room for More Panels Without Buying Oversized Now
It's tempting to go big from day one, but oversized setups can leave you paying for unused surface area and awkward layouts. Instead, think of your current workspace as a starting point that can evolve. A lean, well-chosen base lets you live with the real dimensions of your room and your habits before committing to extra panels.
The trick is to pick a frame or rail system that doesn't lock you into a fixed footprint. Look for connection points, modular brackets, or extension kits that are sold separately rather than bundled into a single unwieldy package. That way, adding a panel later is a simple bolt-on task, not a full teardown and repurchase.
You also avoid the fatigue of forcing a massive setup into a space that doesn't need it yet. Start with what earns its keep today, and let the layout prove where more coverage would actually help. When the need shows up, the expansion path is already there waiting.
Field Wiring and Access: The Details That Make or Break Installation
Most installation failures trace back to wiring paths that were treated as an afterthought. A cable that looks fine on a drawing can become impossible to terminate once the enclosure door, adjacent conduit, and existing bundles are in place. Leave enough slack at each end—not just a few inches, but enough to re-terminate after a mistake or a future board swap. Watch the bend radius on shielded and high-flex cables; a kink from a tight turn may not show up during initial testing, but it will degrade signal or cause intermittent faults months later.
Access is the other half of the equation. If a technician needs to remove four unrelated components just to reach a terminal strip or a field I/O block, the installation may pass inspection but fail in the real world. Arrange field wiring so connections are visible and reachable without a mirror, and label every conductor at both ends with equipment-referenced tags, not generic numbers. Also consider future additions: a well-planned raceway with 20–30% spare capacity and removable covers will save hours compared to a packed conduit that must be abandoned entirely.
FAQ
It consolidates multiple strings of panels into a single output, usually adding overcurrent protection and a disconnect point. Think of it as the electrical junction where several high-voltage DC lines meet before heading to the inverter. Without one, you'd have to run a separate pair of wires from every string all the way to the inverter, which gets messy and harder to troubleshoot.
Count the number of panel strings you're actually installing, then leave at least one or two spare inputs for future expansion or reconfiguration. It's cheaper to buy a slightly larger box now than to replace it later. Many installers overlook this and end up with a box that's completely full, making any addition a headache.
If it's truly indoors and dry, you can get away with a NEMA 1 enclosure. But garages often have temperature swings, moisture, and dust that can degrade connections over time. An outdoor-rated box, like NEMA 3R or 4, costs a bit more but prevents corrosion and keeps out insects—a frequent cause of failures we see in the field.
Fuses are simple and reliable but need replacement after a fault. Breakers can be reset, which is convenient, but they're bulkier and cost more. For most residential setups under 30 amps per string, fuses are fine. If you're dealing with larger commercial strings or want faster recovery after a trip, breakers make more sense.
If your array is in a lightning-prone area or the inverter is far away, surge protection is cheap insurance against induced voltage spikes. A built-in disconnect switch is worth it whenever you need to isolate the array for maintenance or emergency shutdown—otherwise you have to install a separate switch, which adds labor and wall space. Skip these only if you're on a very tight budget and have a very small, low-risk system.
You can, but each input needs to match voltage and current limits. Different orientations mean different output curves, so you might lose some energy if they're paralleled on the same MPPT input. Usually it's better to group similar strings together and use separate combiner box inputs for mismatched sets. The box itself doesn't care, but your inverter's efficiency does.
Once a year, turn off the system and check for loose connections, signs of overheating (discolored insulation or melted plastic), and moisture inside the enclosure. Tighten terminals to the manufacturer's torque specs. Also verify that no critters have built nests. A quick visual inspection prevents most slow-burn failures that lead to arcing.
Conclusion
Choosing the right photovoltaic combiner box starts with your array's electrical parameters, not marketing specs. Check string voltage and current first—if the box's ratings don't line up with what your panels actually produce, nothing else matters. Once that's settled, think about how you want overcurrent protection to behave. Fused inputs are simple and cheap for small systems, but breaker-based designs make troubleshooting and resetting far easier when you scale up. Either way, the enclosure needs to earn its place outdoors: look for proper IP ratings and corrosion-resistant materials if you live with salt spray, heavy rain, or dust storms. Skipping surge protection is one of the most expensive shortcuts—one nearby lightning strike can take out an inverter that costs many times more than the combiner.
It also pays to plan a little ahead without going overboard. A box with extra knockouts or a couple of spare fuse positions lets you add panels later without rewiring everything, but don't buy a 24-string unit for a 6-string array just because it's on sale. Field wiring is where the real pain hides: cramped gutters, tiny terminals, or a poorly placed door can turn a one-hour job into an all-day fight. Make sure you can actually reach the terminals with your tools and that the layout leaves enough bending room for THWN-2 or PV wire. When voltage, protection style, weather resistance, surge handling, expansion room, and practical access all line up, the best combiner box stops being a component and starts acting like a small insurance policy for the rest of your solar setup.
Contact Us
Contact Person: Tonglun Chen
Email: [email protected]
Tel/WhatsApp: 8618906642555
Website: https://www.cncsele.com